Wednesday, December 23, 2009

Winter Resist

Photobucket

This is a fun resist project using oil pastels and watercolors. We used cool colors and the white of the paper and pastels to create snowy winterscapes. First use white oil pastel to make tree branches and snow. Go in with blue pastels to create cedars and other lines. When applying watercolors, the oil pastels will resist and show through. Add salt on top of water colors to create a fun effect! For extra snow, grab a toothbrush and white tempera paint for snowy splatter!

You will need:
-8x10 50 lb water color paper
-oil pastels
-watercolors and brushes
-salt (optional)
-white tempera paint & toothbrush

Tuesday, December 22, 2009

New Projects

Along with Christmas bells and noisy malls, I can hear the sound of brushstrokes and busy children. Over all that, I hear the constant stream of creative buzz going through my head. I have several projects in the works right now. Here is the latest.

Photobucket

I know you are thinking, what is with the picture of a guitar? Well, I am honored and thrilled to be asked with 2 other OKC artists to paint a western theme guitar for an exhibit at the National Cowboy & Western Heritage Museum. The exhibit is titled: The Guitar: Art, Artists and Artisans. It runs Feb 12, 2010 - May 09, 2010. It is going to be outstanding and 3 lucky people will be the proud owners of the local artisan guitars at the end of the exhibit. During the run of the exhibit children will be able to play the guitars and have their picture taken. I hope you will bring your children to take a look! I will be taking mine!

The guitar painting process should be interesting. I am a bit nervous. I don't want to mess it up! :) I am going to sand the guitar and begin painting right away. I will be sure to take photos of the progress!

If you haven't seen the Museum's Winter and Spring Class Schedule, you should take a look! Classes are filling quickly even though I think this is the most offerings they have had since I have been there. It's a big issue! If you have local little ones I hope to see you in the toddler and pre-k classes.

I am also happy to say I will be working with the Metropolitan Library System this summer doing a summer teen art program. We are going to do artist trading cards and I will let you know more when the schedule comes out.

Busy, busy! I have several new projects for children that I will post soon! Have a Creative Day!

Sunday, December 6, 2009

Winter Collage

Photobucket

Yesterday at Drop-in-Art we created a winter wonderland in a mixed media collage project. I am the artist for December and we are doing fun things at the Oklahoma City Museum of Art.

Dec. 12-ornament making (this is another artist, it's my little guy's birthday!)
Dec 19th- Matisse cut out Christmas Cards
Dec 26th-Kandinsky Paintings

Yesterday I encouraged children to think about what it looks like outside in winter. What colors made them think of cold weather, do trees have leaves, etc. We talked about background, foreground, and perspective.

Photobucket

I had two tables set up. One table was the collage table. The children cut and glued their background using bright non fade art paper and scrapbook papers. I showed them they could not only cut paper, but tear paper as well.

Photobucket

After they filled their page they took their piece to the painting table. Here I had black acrylic (the tempera was too transparent) with a variety of brushes for them to paint tree silhouettes in the foreground.

We dried our papers with a hair dryer (this was to help prevent smearing when we move to white paint) and then moved to the splatter station. Here I had white tempera paints set out with toothbrushes and more paintbrushes. This was the magical snowy part. We had a lot of fun and I hope you will too!

You will need:
-14x11 tagboard (heavy paper)
-paper for collage
-scissors
-glue stick
-black acrylic paint
-brushes
-white tempera paint
-toothbrushes
-hairdryer with adult assistance

A few of the child pieces

Photobucket

Photobucket

Photobucket

Photobucket

Photobucket

Photobucket

Photobucket

Photobucket

Sunday, November 8, 2009

Turkey Sculptures

Photobucket

Gobble Gobble! We had a blast creating 3-D turkeys in my Little Gobblers class that was for ages 3-5 years old. It was a full class and we got busy right away.

We began by reading this funny book, 10 Fat Turkeys by Tony Johnson. The kids really LOVED this book!

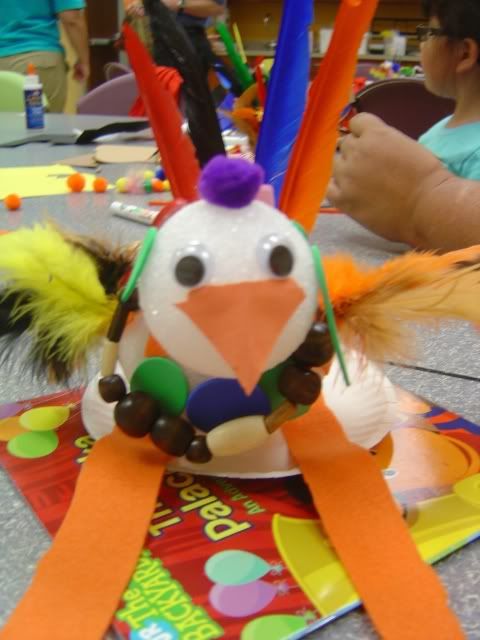
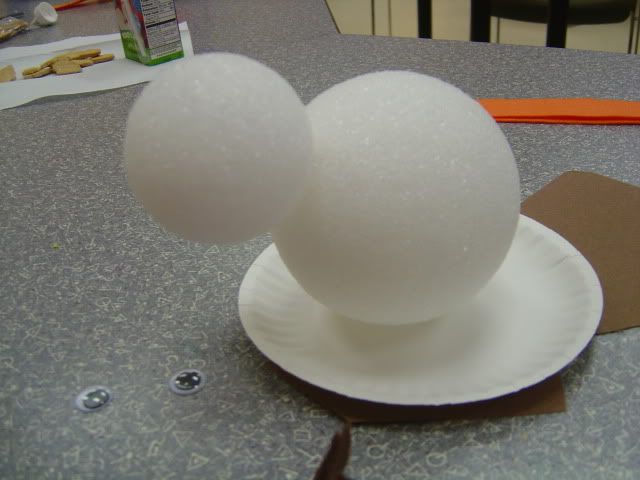
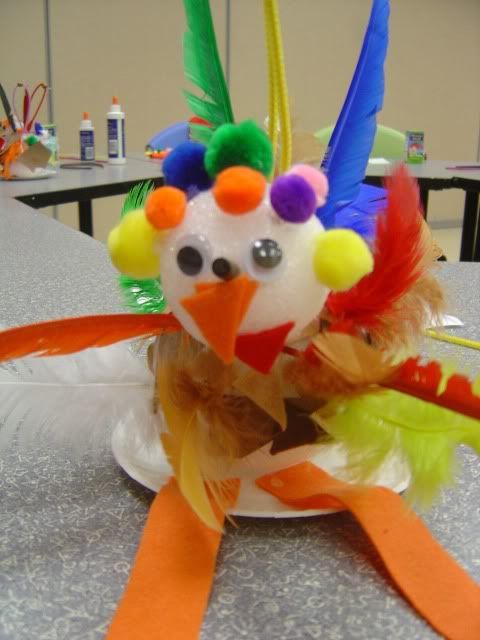
I had turkey bodies prepared and ready for the kids to decorate. I hot glued a medium sized styrofoam ball to a small plate. Then used a small craft stick to attach a small styrofoam ball to make the turkey head.
Photobucket

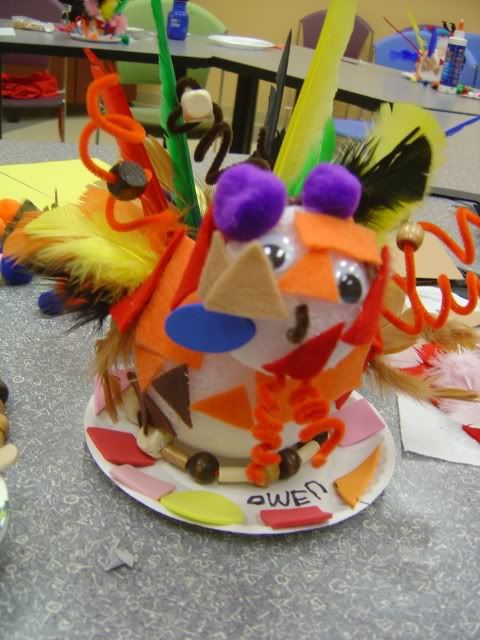
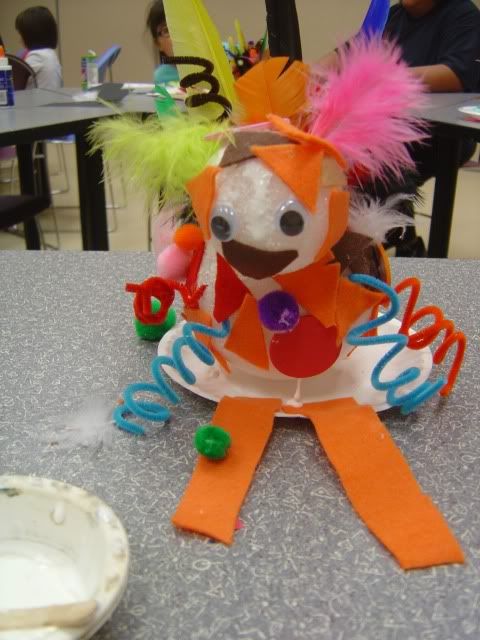
I gave the kids a few basics to start applying to their bodies. I cut felt triangles, set out feathers and pom poms. Then to help encourage the kids to make choices, I let them go through a line with an empty plate to choose buttons, pipe cleaners, beads and more for their creations.

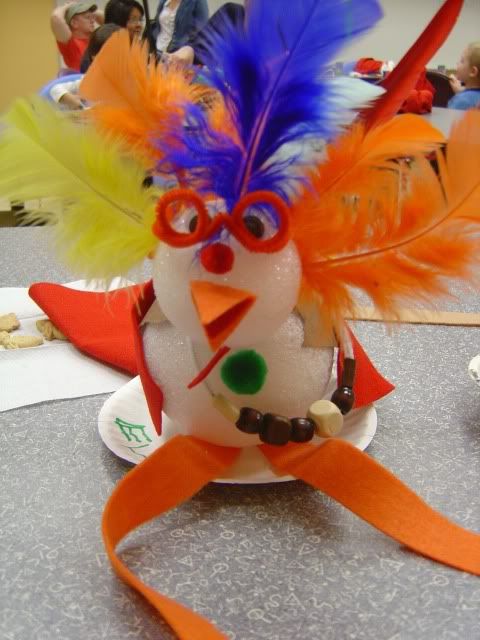
Here are a few more of our turkeys. Shame my camera ran out of room, they were all great. One even has glasses!
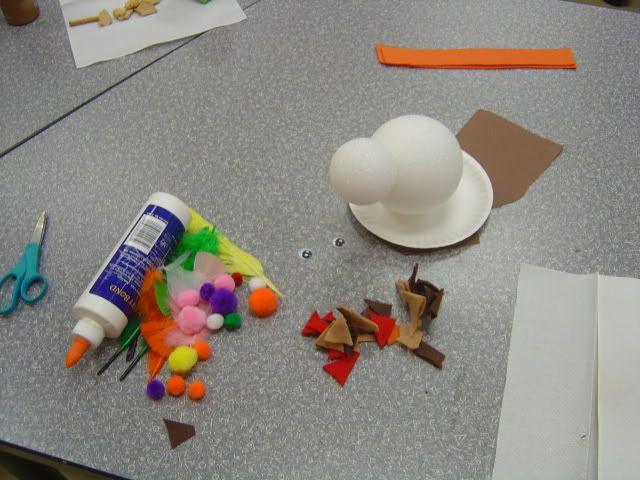
Photobucket

Photobucket

Photobucket

Photobucket

Photobucket

You will need:
-paper plate
-medium styrofoam ball
-small styrofoam ball
-hot glue (for adult to glue turkey body)
-small craft stick
-craft glue for children
-google eyes
-felt pieces
-pom poms, beads, sticky back foam, feathers, papers, pipe cleaners, etc.
-scissors

***note- I think if I do this again, I will pre-paint the styrofoam brown. It would probably take a while to dry, so I am not sure how much time you would need. :) I will do this with my boys this week and try it. I will update!

Friday, October 30, 2009

Happy Halloween!

Louise Bourgeois. Spider, 1997


Pumpkins are carved, costumes are ready. We are excited for Halloween! I have a fun class at the Museum tomorrow called, Spooky Spiders. Spiders in art you say?

Well, the first spider in art I saw (that I can remember) was at the Kemper Museum of Contemporary Art in Kansas City.


My son was terrified! That is the photo above. So, I started to research other spiders in art and here is some of what I found. Who knew?
Kuniyoshi Utagawa,Minamoto no Yorimitsu Battling an Earth Spider (Minamoto no Yorimitsu Tsuchigumo Taiji), c. 1818-1830

Franz Karl Basler-Kopp, Die Schwarze Spinne(1879(1879)–1937(1937)).

Paolo Veronese (1822-1881) - "The reward" Look close to see the spider and web in the hands of figure.

And sometimes a Spider is not so literal, but created through an artists eyes.


Alexander Calder(1898-1976), Spider.

This is at the MoMA. During our whirlwind tour of the MoMA last June I do not recall seeing this particular Calder piece. Maybe I have seen more spiders in art than originally thought!

Have a Happy Halloween!

Wednesday, October 28, 2009

Stay tuned.

I have a rather large idea that came to me last week and am trying to put the wheels in motion. I think writing this down will be some sort of incentive to make sure the wheels keep moving. I'm not trying to be mysterious, but I am excited. Stay tuned. :)

Right now I need to get busy making monster cupcakes for school tomorrow! Have a creative Day!

Saturday, October 24, 2009

Little Dutch Italianates


If you have not been to the museum to check out the new exhibit, you are missing out! The Dutch Italianates: 17th-century Masterpieces from Dulwich Picture Gallery is at the Museum until Jan 3, 2010. These are extraordinary works by Dutch artists that painted Italian landscapes. You might recognize some of the artists, like Pynacker, Cuyp, and Vermeer. Allow yourself plenty of time to take in each painting as there are so many details to see. It's sort of like a game of I spy, which I play with my classes. I spy two boys fishing...I spy a cow... I spy a bridge... they love to play and everyone gets a turn to spy.

I had a hard time coming up with class ideas for this since the paintings are realistic and so detailed. From what I have seen, the toddler and pre-k classes don't seem to enjoy this style of artwork as much as they enjoy the modern art and Chihuly works on the 3rd floor.

What I decided to do was talk about landscapes. We payed special attention in the exhibit to the land, sky and objects in the landscapes which happened to be a lot of animals. The kids loved finding animals and toddlers made the animal sounds and were very pleased with themselves.

Photobucket

In the pre-k class we used watercolors to paint our land first. Ground for our animals to stand on and then a sky for them to look up at. Prior to the class I drew and cut out horses and sheep. They used watercolor pencils to add details to the animals and then glued them to the watercolor landscapes they painted. We added final details and they were finished!

Photobucket

You will need:
-50 lb water color paper
-watercolors
-water and brushes
-watercolor pencils
-glue
-animal shapes

Photobucket

The toddler class was a bit different. We used sponges and tempera paints to create our landscapes. First I gave them green and yellow to sponge their ground. Then I gave them blue to make a sky. We finished with some brown to add trees or mountains..or DIRT, one child yelled. :) We glued our animals on top and finished with an oval mat.

Photobucket

Photobucket

Music to paint by

I love music. I memorize lyrics better than multiplication tables. I like to listen to music while I get ready, cook, drive, run, and especially when I paint. I have been a long time U2 fan (mostly thanks to my sister who listened to them before they were cool) and was lucky enough to go with the most excellent neighbors and friends to this amazing concert. I have just about all the old stuff-except for the album Pop, but I was missing the new one, so I bought No Line On The Horizon and have been painting to it since!

Photobucket

Photobucket

Photobucket

Photobucket

Big Sky

My latest painting titled Big Sky is framed, finished and ready to make big money at my son's school auction tonight!

Photobucket

Monday, October 19, 2009

Roadside Cotton Candy

Photobucket

OVAC's big event 12x12 is long over but I never got around to posting about it. The event was another huge success and I was proud to be part of it once again. There are so many wonderful artists in Oklahoma that want to be in the show and I have been lucky enough to have been invited for the past 6 years. I have also been lucky enough for my piece to sell each year.

This year I did an acrylic titled Roadside Cotton Candy. It was inspired from a trip to Montana that my husband and I took together. It was one of the few trips we were able to make without the boys tagging along. My heart really belongs to the mountains of Colorado but Montana quickly started to win me over with it stillness, wildlife and big sky.

I have been busy in my kitchen studio working away on several projects...I'll keep you posted!

Here is a WIP primed, outlined and ready to be filled with paint!

Photobucket

Warhol Fall

Photobucket

For a day of Drop in Art fun we focused on repetition and color drawing inspiration from Andy Warhol. I had the kids think of one fall item and it had to be something simple enough to draw several times.

Photobucket

These examples have 9 drawings, but they could be done in in any number combination. We used black marker to divide our paper into sections and then we drew that one item in each section. We used oil pastels to fill in the areas. It was fun for the kids and parents to use oil pastels. Many commented on how much they liked them and that they had never used oil pastel before.

Photobucket

You will need:
-white paper any size
-black marker
-pencil (optional to lightly sketch first)
-ruler (optional)
-oil pastels

Wednesday, October 14, 2009

Fall Finger Leaves

Photobucket

In this fun class for ages 15-36 months we focused on the beginning of fall. We looked at a few books and talked about trees and how the color of the leaves are going to start changing.
I had wanted Lois Ehlert's Red Leaf, Yellow Leaf but all copies were checked out of ALL local libraries! I ordered it from Amazon so I will have it for our collection here at the house. I really enjoy all of Ehlert's books, so do my boys.

We talked about trees, fall colors and found them in the museum. In the class we rolled up our sleeves to create our own Ode to Fall-via fingertips, paint, glue and paper. We glued the brown strips to make trunks and used our fingers and hands to create fall foliage. (Getting hands in paint is a great sensory building experience.)
Photobucket


You will need:
-14x11 piece of student grade watercolor paper
-strips of brown construction paper
-red, yellow, orange washable paint
-glue

While our pieces dried we sang a little song to movement: (tune of London Bridge)

autumn leaves are falling down,
falling down,
falling down

autumn leaves are falling down,
red,
gold,
and brown.

So much fun!
Photobucket

Photobucket

Photobucket

Photobucket